
The Day I Ruined a Million-Dollar Print Job Because of One Blurry Pixel
I will never forget the absolute horror of waking up to thirty missed calls from my biggest client on a Tuesday morning. I used to think I was a design genius who could just eye things out, but that morning proved I was living in a total fantasy world. The client had spent thousands printing premium product packaging, and the corporate brand blue looked like mud. It wasn’t a sleek, deep royal blue; it was a sickly, washed-out navy. I sat at my desk, sweating through my t-shirt, frantically opening my source files to see where I messed up. When I zoomed in to 1600% on the reference photo, the truth hit me like a slap in the face. I didn’t know how to use the eyedropper tool to match colors like a pro, and that ignorance cost us big time. I had carelessly clicked on a single compressed, stray shadow pixel instead of the actual brand color.
Since that day, I made it my absolute life mission to master every hidden setting behind that little digital pipette. If you are still just clicking blindly on your canvas and hoping for the best, you are setting yourself up for an expensive disaster. Color is pure chemistry mixed with psychological trickery, and your monitor is probably lying to you right now. Let’s talk about how to stop guessing and actually learn how to use the eyedropper tool to match colors like a pro so you never have to feel that crushing chest pain of a ruined project. Read previous article on How I Mix Bold Headlines and Minimal Fonts for Website Banners.
The difference between guessing your shades and true color harmony inside Canva. My editing outcome.
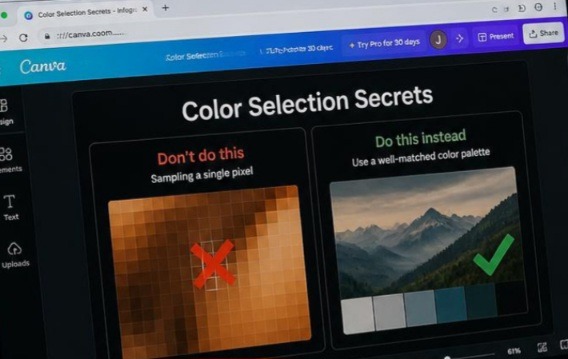
This layout proves why relying on automatic software defaults is a massive trap for content creators. The left panel shows how a single compressed pixel completely throws off your design’s mood, while the right panel demonstrates a balanced, professional color selection that instantly elevates the look. It is a visual testament that clean design requires intentional technical adjustments, not just random clicking.
What I Experienced with Blurry Pixels and Hurt Pride
Let me take you back to what I passed through during that specific freelance nightmare. When you are looking at a beautiful photograph on your screen, your eyes blend millions of individual shades together. You see a gorgeous sunset gradient. Your software, however, just sees a chaotic grid of individual blocks.
I was building a website header for a high-end organic skincare brand. The mood board was filled with soft, warm peach tones and muted earthy nudes. I grabbed my mouse, tapped the standard keyboard shortcut, and clicked right on what looked like a beautiful cream background. On my screen, it looked okay. But when the site went live, the text box looked completely green-gray against the rest of the layout.
I was completely delusional. I blamed the client’s monitor. I blamed the web browser. I even blamed the lighting in my room. But the problem was simple: I was using a point sample on a low-resolution JPEG. The image had noise, and my cursor had sampled a tiny, microscopic digital artifact that wasn’t even visible to the naked eye. It was a humbling lesson. True professional color matching isn’t about having a great eye; it’s about forcing your software to look at the bigger picture.
The Secret Settings You Are Probably Ignoring Right Now
The absolute biggest mistake I see young designers make is assuming the tool works perfectly right out of the box. It doesn’t. If you open Adobe Photoshop right now and select the tool, look up at the top options bar. See that little setting called Sample Size? By default, it is almost always set to Point Sample.
[ Options Bar ] ➔ [ Sample Size: Point Sample ❌ ] -> Picks 1 random pixel [ Options Bar ] ➔ [ Sample Size: 3x3 or 5x5 Average 👁️ ] -> Smooths out the noise Point sample means you are telling the computer to look at exactly one single pixel. If that pixel happens to be a piece of compression noise or a random artifact, your whole color palette is ruined. To actually use the eyedropper tool to match colors like a pro, you need to change that dropdown to a 3×3 Average or a 5×5 Average. This tells the software to take a tiny sample of the surrounding area, blend them together, and give you the true mathematical average of the color. It instantly eliminates the risk of grabbing a rogue pixel.
My Absolute Opinion on Color Harmony Formulations
Here is my controversial opinion that might make some old-school art teachers mad: your eyes are completely useless tools for verifying color harmony. Human vision is incredibly subjective and easily tricked by surrounding contexts. A color that looks warm against a black background will look completely cold and dead against a bright white background.
Stop trying to eye it. If you want to know how to use the eyedropper tool to match colors like a pro, you have to stop trusting your biological eyes and start trusting hex codes, RGB values, and CMYK percentages. I have seen designers argue for two hours over whether a primary accent color looked too purple, when a quick glance at the color panel information would have shown them that the magenta channel was cranked up way too high. Color matching is a science project, not a guessing game. Use the tool to gather data, not just to look for something that feels right.
Late-night editing sessions are much smoother when your color matching workflow is dialed in. This is my workspace during the edit.
Escaping the Software Sandbox
Did you know you aren’t actually trapped inside your design window? This blew my mind when I first figured it out. Most people think that if they want to grab a color from a website or an inspirational image on Pinterest, they have to take a screenshot, save the file, import it into their workspace, and then sample it. That is a massive waste of time and it clutters your hard drive with useless junk.
If you are working in Canca, Adobe Illustrator or Photoshop, you can actually sample colors from your entire desktop screen, including your web browser.
- Drag the cursor entirely out of the software window and hover over anything on your monitor.
- Release the mouse button over the exact color you want from your web browser or reference folder.
- It instantly grabs the external hue without making you download a single thing. It feels like magic, and it completely changes how fast you can build a mood board.
The Mental Shift: Think Like a Painter, Not a Machine
Think of your digital sample tool like a physical paint blending stick. When a traditional painter wants to match a color in real life, they don’t just dip their brush into one microscopic spot on a leaf. They look at the highlights, the midtones, and the deep shadows, blending them on a palette until the overall vibe matches.
When you learn how to use the eyedropper tool to match colors like a pro, you are doing the exact same thing digitally. If you are sampling from a live photo of a model wearing a green jacket, that jacket contains thousands of shades of green caused by lighting, fabric folds, and camera grain. If you click on the brightest highlight, your design will look fluorescent. If you click on the deep fold, your design will look muddy. You have to consciously choose the midtone, the area where the true color lives without the interference of direct light or heavy shadow.
Common Mistakes to Avoid
Sampling through adjustment layers: If you have a global color grade or a brightness filter turned on over your artwork, your tool will sample the modified color instead of the raw asset. Always turn off your adjustment layers before picking your core shades.
Forgetting about document color modes: Grabbing a beautiful vibrant neon pink from a website will look absolutely terrible if your project file is set to a restricted CMYK print profile. The software will try to smash that glowing digital light into a dull printable ink mix.
Ignoring the canvas vs. layer rule: Some software allows you to choose whether you want to sample from your active working layer or the entire visible canvas. If you sample the canvas by accident, you might end up grabbing a weird blend of your background grid lines or transparent pixels.
Check out this excellent, quick breakdown on Canva Color Matching by a YouTube creator: What You’re Doing Wrong to see exactly how to navigate the design interface, fix color rendering issues, and mix custom tones like a seasoned professional.
Frequently Asked Questions
Why does the color I sampled look totally different when I paint with it?
This is usually caused by the blend mode of your active layer or brush tool. If your layer styling is set to something like Multiply, Overlay, or Screen, the hue will interact mathematically with whatever sits underneath it, completely changing its visual appearance.
How do I sample a color and instantly save it for later use?
Once you click on a color with your sample tool, it becomes your active foreground color. Immediately open your Swatches panel and click the small plus or page icon at the bottom. This locks that exact hex code into your document profile so you can reuse it across multiple assets without needing to resample it later.
Can I use this trick to copy text properties too?
Yes! In layout apps like Adobe InDesign, the eyedropper tool can be configured to pick up type attributes like font size, tracking, leading, and paragraph styles instead of just visual colors. You just click the styled text once, and then click over your unstyled text to instantly apply the matching formatting.
The Real Power of Intentional Design
Using design software isn’t about memorizing basic button layouts. It is about understanding how digital information is structured so you can control it completely. Once I stopped treating my color selection like a game of digital roulette, my work transformed completely. My layouts started feeling more cohesive, my brand systems looked intentional, and I never had to buy a panicked client a replacement batch of printed merchandise ever again.
Take five minutes today to open your preferred design application, adjust your average sample size settings, and practice pulling reference tones directly from external inspiration windows. It is a tiny structural tweak, but it completely changes the quality of your output. Your clients, your portfolio, and your sanity will absolutely thank you for it. Master advanced color matching options bar photoshop illustrator
Sources and Citations
Adobe Help Center official documentation on advanced sample properties: Adobe Help: Sample Image Colors.
Adobe Illustrator vector control tips: Adobe Help: Pick Colors with Eyedropper.
Microsoft Support breakdown on cross-window screen sampling techniques: Microsoft Support: Use Eyedropper on Slide.

Udeichi Miracle Chinaza is a digital creator and graphic designer who specializes in creating clean, visual content. Passionate about making design accessible to everyone. I share practical Canva tutorials, layout tips, and creative shortcuts to help beginners and small businesses build stunning graphics with ease.