
The Visual Clutter that Kills Great Graphics
I learnt recently that the human eye takes less than a fraction of a second to decide if an image looks premium or completely chaotic. For the longest time, I couldn’t understand why my promotional graphics and product mockups looked so messy. I would place a sharp cutout of an object or a portrait over a textured photo, and the entire layout would collapse into an unreadable disaster. The subject would get completely swallowed up by the pattern behind it. It took an embarrassing amount of bad designs before I discovered how simple adjustments change everything. Learning How I Instantly Blur Busy Backgrounds In Canva to Make My Images Pop completely revolutionized my workflow, saving me from losing my mind trying to fix bad photography setups.
Image by StartupStockPhotos from Pixabay
What I personally Did: The Outdoor Market Nightmare
Last year 2025, I was putting together a banner for a local maker who crafted gorgeous, artisanal candle jars. She shot all her product images outside at a busy weekend street market. The candles themselves were stunning, but the background of the photos was an absolute circus. You could see random pedestrian legs, half of a bright blue food truck trash can, and a heavily pixelated parked car right behind the elegant wax jars. Read previous tutorial on My Go-To Modern Color Palettes for Clean Branding.
I originally tried to overlay bold white text across the image, but the letters crossed right over the food truck wheels and became totally illegible. It looked incredibly cheap. Out of pure frustration, I almost opened a heavy photo editor to manually map out blur layers. Instead, I stayed inside my standard web browser dashboard and experimented with the built-in focus sliders until the background noise melted away into a gorgeous, high-end studio blur.
When the maker posted the updated banner, her pre-orders doubled in forty-eight hours. The audience wasn’t distracted by market trash anymore; their eyes were locked onto the texture of the wax and the logo imprint. That project taught me that great marketing visuals are entirely about managing depth, not just piling on elements.
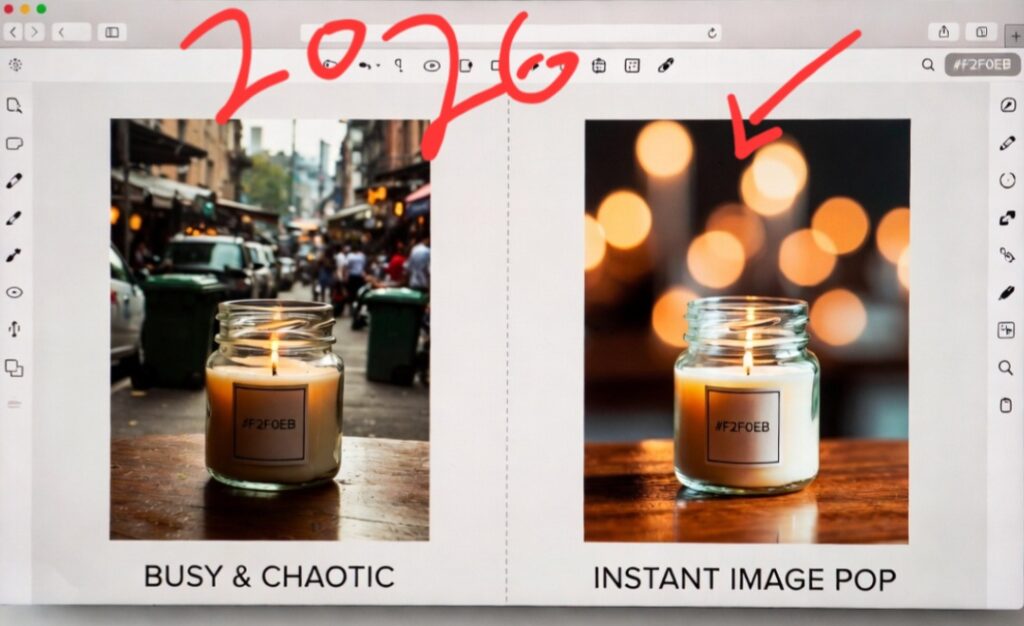
The visual warfare of a completely sharp, chaotic background (left) vs. the immediate, professional separation created by an elegant depth-of-field blur setting (right). The result i got is exceptional. I did this just to see the outcome.
The Separation Trick That Makes Graphics Look Expensive
Take a close look at the split visual above, you can immediately spot why flat, unadjusted photos destroy your brand’s authority. The graphic on the left isn’t failing because the product is bad, it is failing because your brain is forced to process the street clutter at the exact same sharp resolution as the candle jar itself. The background is literally fighting your subject for optical dominance.
The right side introduces immediate structural luxury. By washing away the background pixels into a creamy, abstract backdrop, you create a dedicated staging zone. The subject doesn’t just sit on the canvas; it leaps forward. This simple post-production trick tricks the viewer’s subconscious into thinking the image was shot on a high-end editorial set, giving you instant professional leverage completely free of charge.
The Illusion of the Expensive Camera Lens
We need to break a massive design myth right now. People assume that beautifully soft, out-of-focus backgrounds (the aesthetic effect photographers call bokeh) can only be captured using a massive DSLR camera and a luxury three-hundred-dollar portrait lens. That is an outdated perspective. Modern graphic depth is created entirely in post-production processing.
When a background is completely sharp, every leaf, brick, and background element fights with your text layers for visual dominance. By applying a deliberate blur gradient, you are essentially creating an artificial shadow zone. This zone tells the viewer’s brain exactly what matters on the canvas, instantly creating a sense of premium luxury.
The Three Essential Blur Strategies
To get a flawless depth-of-field effect that doesn’t look like a cheap digital smudge, you need to use the right settings for your specific image file.
- The Auto-Focus Intelligent Blur
Select your background photo on the editing board, click Edit Photo on the top menu bar, and scroll down to the Effects tab to find the Auto Focus tool. The internal engine automatically scans the pixels, separates the foreground subject, and applies a smooth, gradual blur to everything else. You can adjust the blur intensity slider to find the perfect sweet spot.
- The Selective Blur Brush
If the automatic engine misses a spot around hair or complex product edges, swap over to the manual Blur Tool. This gives you a literal brush interface where you can physically paint blur effects over specific distracting corners, like a stray background sign or a bright light flare without changing the sharpness of your main object.
- The Whole-Image Backdrop Melt
If you are using a textured photo strictly as a backdrop for a text-heavy quote graphic, do not worry about isolating a subject. Select the image, open the Adjust tab, find the Blur slider under the texture configurations, and crank it up to a high value. This turns a busy street scene into a soft, abstract gradient pattern that holds text beautifully.
Putting An End to the AI Design Monotony
Let’s keep things real for a second. The internet is flooded with identical, flat vector graphics because most creators are too lazy to touch the depth sliders. If you want your social feeds to look alive and deeply human, you need to play with depth perception.
Try creating a double-layer design. Duplicate your main image layer, remove the background of the top layer entirely using an extraction tool, and apply a heavy blur setting strictly to the bottom layer underneath. This creates a hyper-realistic, three-dimensional pop-out effect that makes a flat screen look like a tangible gallery window.
I know reading might confuse you, do you want to see the blur brush in action?
If you prefer watching the exact settings panel update I used in real-time over reading a manual, I will advise you to checkout this incredibly straightforward walkthrough by a fellow designer on YouTube. You can see in the video that the youtuber perfectly demonstrate how to control selective masking and brush weights, serving as the ultimate visual companion to the three blur strategies we just unpacked.
Video: A quick canvas walkthrough showing how to use the selective photo editing tools to blur backgrounds and create high-contrast marketing graphics.
Frequently Asked Questions
Does blurring an image make it look low quality when downloaded? Not at all. Blurring a busy background actually compresses the unnecessary file data, often making your final PNG download render faster on mobile web pages while keeping your foreground text incredibly sharp and readable.
How do I blur a background if the tool is locked? If the photo editing panel tells you the advanced blur brush is unavailable, ensure your image asset is a flat image file and not grouped inside a custom frame or vector element shape wrapper. Un-group the asset first, then open the effect panel again.
What is the ideal blur intensity number for clean branding? For product shots and portraits, keep your blur intensity slider between fifteen and thirty-five percent. Going past forty percent completely destroys the environment context, making the cutout look floating and unnaturally fake.
The Spatial Habit to Build
The real secret to high-end digital design is controlling where your audience looks first. If your background is screaming as loud as your headline, your message gets completely lost in the noise.
The next time you are building a graphic block and it feels cluttered, do not start deleting your text or changing your fonts. Take a step back, look at the visual noise happening in the background layer, and apply a smooth depth blur to soften the distraction. Your text will instantly become readable, your layouts will carry a professional editorial weight, and your brand will cut right through the chaotic digital noise without needing a flashy upgrade.

Image by Karolina Grabowska from Pixabay
Sources and Citations
Detailed camera sensor processing and depth field mechanics via the Cambridge in Colour Photography Texture Studies.
Digital focal point manipulation standards detailed on the official Adobe Photoshop Spatial Blur Workflows documentation portal.
Visual information processing and graphic isolation analysis found on the Interaction Design Foundation Visual Hierarchy Guidelines.

Udeichi Miracle Chinaza is a digital creator and graphic designer who specializes in creating clean, visual content. Passionate about making design accessible to everyone. I share practical Canva tutorials, layout tips, and creative shortcuts to help beginners and small businesses build stunning graphics with ease.