
The Sloppy Habit I Left in the Past
I was looking back at my client archive folders from 2025 last week, and I realized I was making massive editing mistakes that cost me dozens of hours of unnecessary work. Back then, my design workspace was an absolute minefield of unanchored layers, loose icons, and drifting text fields. I would spend an hour perfectly centering a headline, only to accidentally nudge the background image with my mouse and send the entire composition into absolute chaos. It was incredibly frustrating. By the time 2026 rolled around, I vowed to clean up my act and build a more professional workflow. If you are constantly chasing stray text boxes across your browser canvas, you are probably Tired of Messy Layouts? Here is How I Group Elements in Canva to permanently lock my graphic assets into a unified, expensive-looking structure.

Image by StartupStockPhotos from Pixabay
Behind the Scenes: The Multipage Slide Disaster
Let me tell you about a complete layout nightmare that forced me to change my design habits. I was hired to build a 15-page digital pitch deck for a modern real estate startup. Each slide featured a complex arrangement of property data points: a tiny house icon, a bold price numbers layer, a paragraph description box, and a subtle background accent shape. Checkout my previous article on How I Pair Elegant Fonts for Intimate Event Invitations.
On the first draft, I left every single one of those objects completely loose. When the client requested a minor font change across the entire presentation, I had to click into each slide manually. Because the elements weren’t locked together, expanding the text size caused the pricing numbers to overlap the icons, turning the entire pitch deck into a chaotic soup of overlapping pixels. I spent my whole weekend dragging single elements back into place, screaming at my monitor in the middle of the night.
That disaster was the exact turning point for me. I realized that if you are Tired of Messy Layouts? Here is How I Group Elements in Canva to ensure that your design pieces move as a single unit, keeping your spacing ratios completely intact no matter how many times you edit the surrounding canvas.
I spent my whole weekend dragging single elements back into place, screaming at my monitor in the middle of the night. That disaster was the exact turning point for me. I realized that if you are Tired of Messy Layouts? Here is How I Group Elements in Canva, it is an absolute game-changer. Learning this workflow means you ensure your design pieces move as a single unit, keeping your spacing ratios completely intact no matter how many times you edit the surrounding canvas.
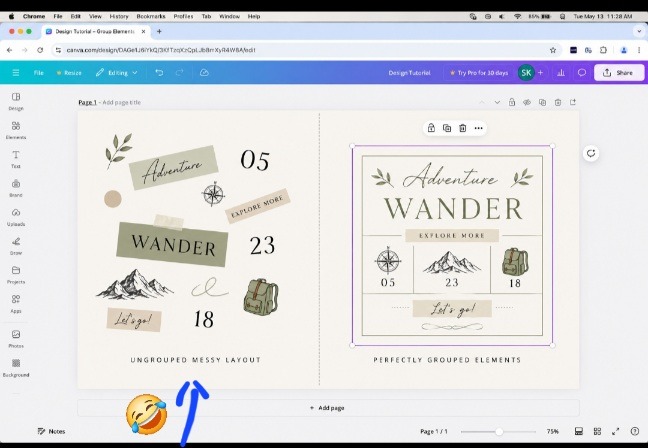
The time-wasting catastrophe of loose, unanchored layers drifting across the workspace (left) vs. the serene layout control of structured, grouped graphic elements (right). This is why you should be creative and smart as a designer. Just look at my own…
The Core Blueprint for Visual Alignment
The secret to modern, clean branding isn’t about using flashy decorations; it is about absolute spatial discipline. When a human eye views a graphic, it instantly detects if a sub-headline is two pixels too close to an icon. These tiny misalignments signal to your audience that your brand is rushed, unpolished, and amateur.
If you are Tired of Messy Layouts? Here is How I Group Elements in Canva to solve this exact problem:
- The Multi-Select Click Sequence
To bind separate layers into a single entity, hold down the Shift key on your computer keyboard and click each item you want to join. You can also click and drag a large selection box over the specific region of your artboard to highlight them all at once.
- The Keyboard Shortcut Shortcut
Once your target graphics are highlighted inside the blue boundary lines, ignore the top toolbar options to save time. Hit Ctrl + G on Windows or Cmd + G on a Mac computer. This instantly fuses the elements together into a single, collective bounding box.
- Protecting the Ratio Settings
When your layers are successfully bound, you can scale the entire group up or down from the corners without ruining the individual distance parameters. The font sizes and icon spacing will shrink or grow in perfect mathematical harmony.
Breaking the Sterile Template Grid Pattern
Let’s be completely transparent for a moment. Most automated graphics look incredibly cold and uninspired because creators simply slap elements onto a page and trust the default alignment grids to do the work.
When you understand how to organize your assets into distinct structural bundles, you gain the creative freedom to play with dramatic asymmetry. For instance, you can bundle a bold, high-contrast title text block with a minimalist star icon, group them together, and position the entire cluster in the bottom third corner of your frame while leaving the top completely empty. Because the cluster is safely bound, you can experiment with radical layouts without worrying that your structural text settings will break apart when you hit download. This is why I tell people who are Tired of Messy Layouts? Here is How I Group Elements in Canva to break free from the boring, uniform template look that everyone else is settling for.
Reading about keyboard shortcuts is one thing, but watching the layout mechanics shift on a live dashboard makes the process stick much faster. If you want to see exactly how your cursor behaves during a multi-layer merge, check out this practical walkthrough hosted by a fellow creator on YouTube.
Seriously, if you are Tired of Messy Layouts? Here is How I Group Elements in Canva today, do not skip over the mechanical layout strategies covered in that video presentation. The video tracks the exact step-by-step clicks required to fuse moving parts, serving as an excellent spatial guide to the multi-select workflow we just unpacked.
Frequently Asked Questions (two of my friends asked me this)
How do I temporarily edit a single text box inside a locked group? You do not need to separate the entire cluster to make a minor text update. Simply double-click directly on the specific word layer inside the group bounding box. The application will isolate that single layer, allowing you to rewrite the copy while keeping the overarching group format locked.
Can I nest multiple small groups inside a larger group master layer? Yes, absolutely! This is an excellent tactic for complex data infographics. You can group an icon and a text box together, then select three of those finished sub-groups and merge them into one giant master container that controls the entire column layout. This is how to group and lock multiple elements inside Canva.
Why is the grouping button grayed out on my dashboard menu panel? The formatting button will become unavailable if you have accidentally highlighted a background image that is completely padlocked to the artboard grid. Click the canvas background once, unlock it via the top utility toolbar, and then retry your multi-selection sequence.
The Organization Habit for High-Speed Content Production
In nutshell, clean design is entirely about building smart production habits that protect your creative sanity. Leaving your project canvas scattered with unanchored text boxes is a recipe for endless editing frustration.
Don’t make mistakes, be creative. If you are building a digital product announcement or a multi-page guide and find yourself overwhelmed by drifting elements, I will advise you to stop what you are doing. Take a step back, look at which items belong together naturally, and combine them into distinct structural clusters. If you are Tired of Messy Layouts? Here is How I Group Elements in Canva to regain absolute mastery over your visual grid lines, protect your alignment scores, and ensure your brand carries an expensive, highly polished presence across every single social media platform.
Image by StartupStockPhotos from Pixabay
Sources and Citations
Spatial organization principles and web interface layer grouping standards via the W3C User Interface Component Design Specifications documentation repository.
Gestalt psychology principles regarding proximity and visual containment detailed on the Interaction Design Foundation Visual Hierarchy Guidelines.
Advanced multi-layer canvas data alignment strategies found on the Mozilla Developer Network (MDN) Web Application Layout Guidelines.

Udeichi Miracle Chinaza is a digital creator and graphic designer who specializes in creating clean, visual content. Passionate about making design accessible to everyone. I share practical Canva tutorials, layout tips, and creative shortcuts to help beginners and small businesses build stunning graphics with ease.